Hardware build // weekend project
The bottle stand that logs the 3am feed.
A load cell under a 3D-printed stand weighs the bottle, you tap a button at the start and end of a feed, and it writes the volume, time, and duration to Notion, with an optional Telegram ping. Set it down full, feed, set it back down. Done.
A 3D-printed stand with a load cell weighs the bottle. You tap once when a feed starts and again when it ends: it works out the volume consumed (weight before minus weight after) and the duration, then logs every feed to a Notion database. A small OLED shows live weight and the last feed; real wall-clock timestamps come from NTP, so "started 2:42am" is actually accurate.
- Difficulty
- Beginner–Int.
- Cost
- ~$15
- Build time
- A weekend
- Logs to
- Notion
one fiddly mount + a calibration
USD in core electronics
a single day if parts are on hand
+ optional Telegram ping
What you need
Parts
- ESP32 DevKit V1 The Wi-Fi brains
- Load cell, 1 kg bar type The weighing sensor
- HX711 amplifier board Reads the load cell
- Momentary push button Start/stop; optional 2nd for tare
- SSD1306 0.96" OLED (I2C) Live weight + last feed
- Breadboard + jumper wires Prototyping
- USB power adapter Mains power
- 3D-printed stand MakerWorld load-cell scale remix
Tools
- Soldering iron + solder Load-cell wires to the HX711
- Computer + USB data cable Flashing the ESP32
- PlatformIO (VS Code) or Arduino IDE Compile + upload
- Breadboard + Dupont jumpers Prototyping the wiring
- A known weight (250 mL water = 250 g) One-time calibration
- 3D printer or print service The stand
The build
Step through it
10 steps. Scroll to move through them one at a time , or jump around with the arrows, the rail, or your ←/→ keys.
-
 20 min
Set up Notion first
Do the cloud part before you touch hardware: it has the most unknowns, and
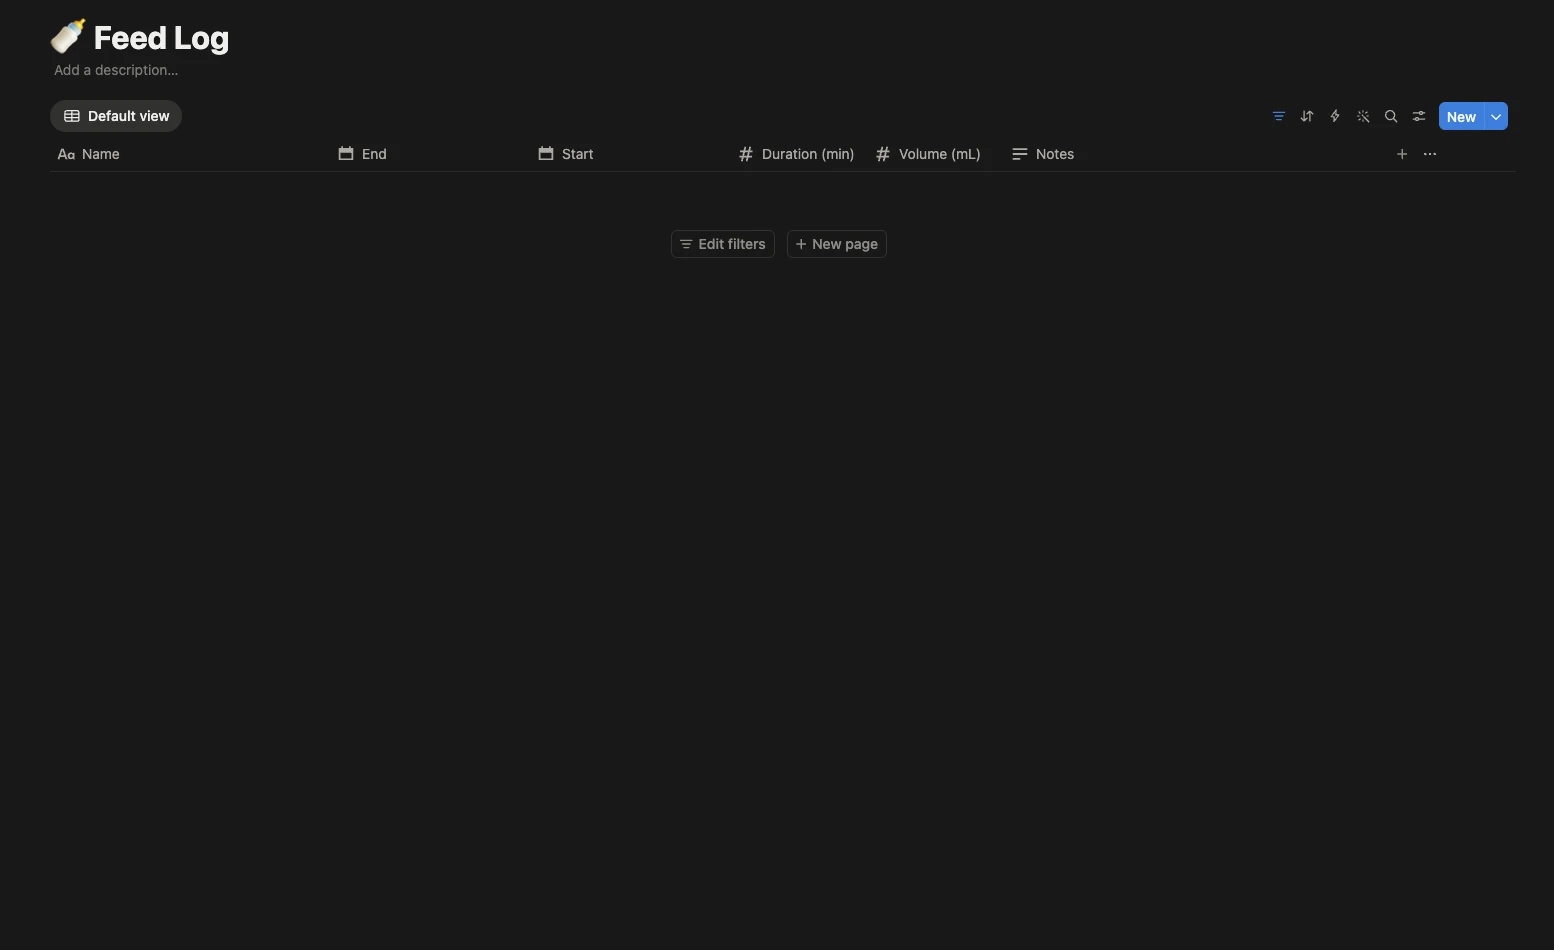
you want the token + database ID in hand before you flash.- Go to notion.so/my-integrations → New integration, name it "Feed Logger",
copy the Internal Integration Secret (starts withntn_orsecret_). - Create a database called Feed Log with these properties:
Property Type NameTitle (auto) Start/EndDate (include time) Duration (min)Number Volume (mL)Number NotesText - Open the database → ••• → Connections → add "Feed Logger".
- Copy the database ID, the 32-char hex chunk in the URL before
?.
Run the optional
curltest fromsoftware/README.mdif you can, it isolates cloud problems from device problems before any soldering. - Go to notion.so/my-integrations → New integration, name it "Feed Logger",
-
 15 min
Connect the load cell to the HX711
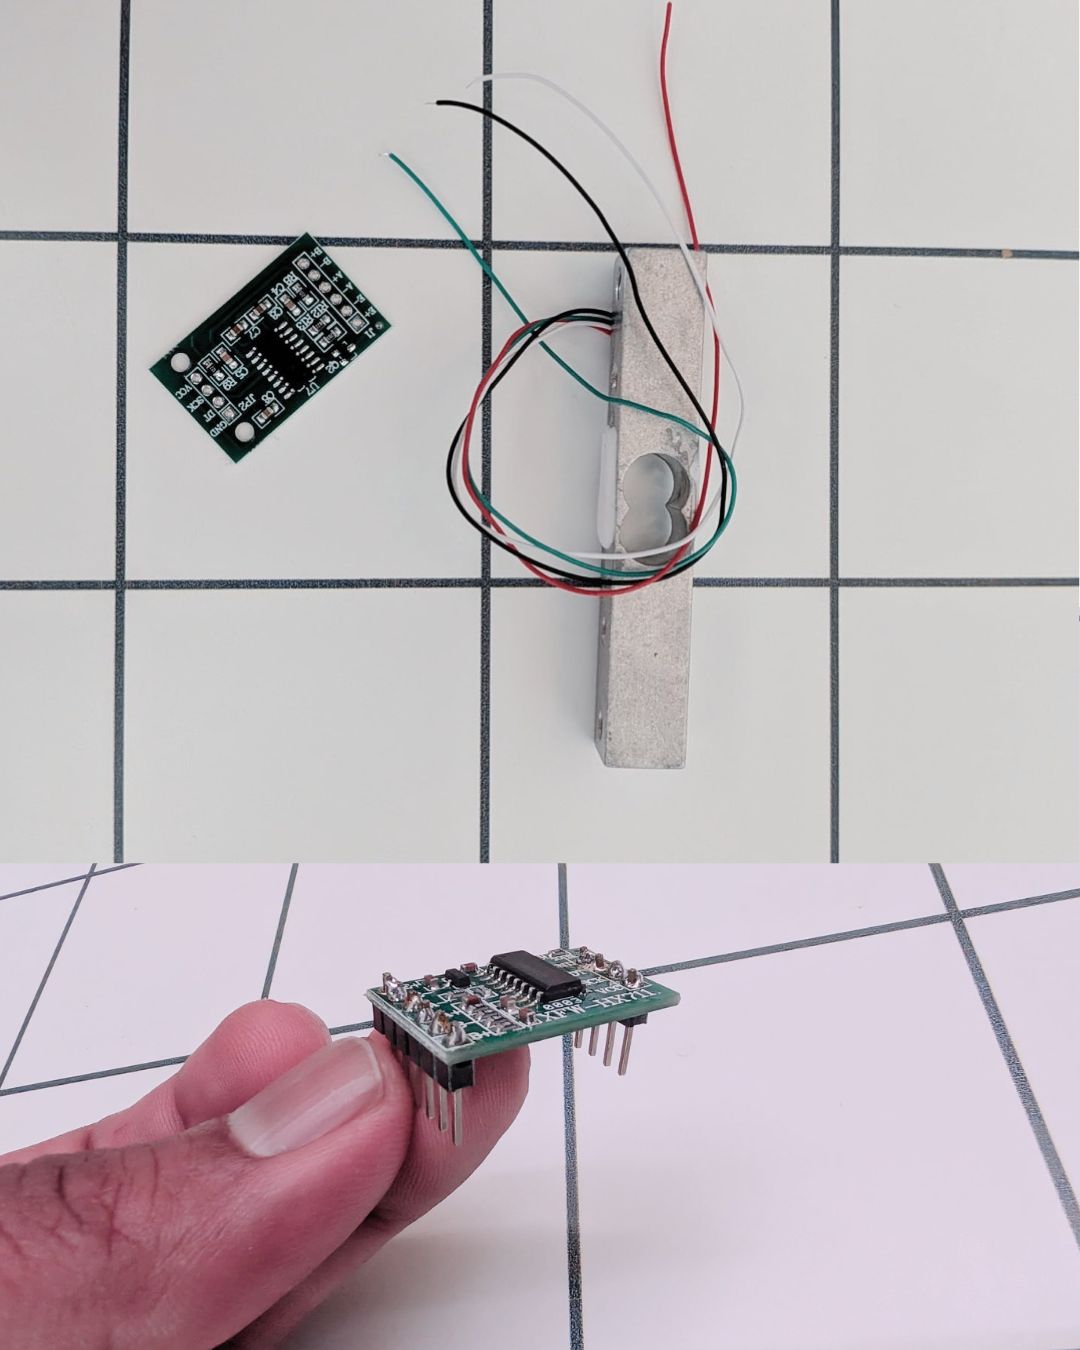
The load cell's four thin wires map to the HX711's input pads:
Load-cell wire (typical) HX711 pad Red E+ Black E− White A− Green A+ Solder the wires straight to those pads, or do what I did: solder header
pins to the HX711 and plug it into the breadboard, then run the load-cell
wires in from there. Same mapping either way. Keep the joints clean, no
bridges.Wire colors vary by manufacturer, so verify against your load cell's datasheet. If readings come out negative later, swap A+ and A−.
-
 15 min
Wire the HX711, OLED, and button to the ESP32
All on the breadboard for now. Power both the HX711 and OLED from 3.3V.
HX711 ESP32 OLED ESP32 VCC 3.3V VCC 3.3V GND GND GND GND DT GPIO 16 SDA GPIO 21 SCK GPIO 17 SCL GPIO 22 Button: one leg to GPIO 25, the other to GND. Optional tare/calibrate
button: GPIO 26 ↔ GND.The HX711 runs on 3.3V, never 5V.
-
 Generated image, for reference only 20 min
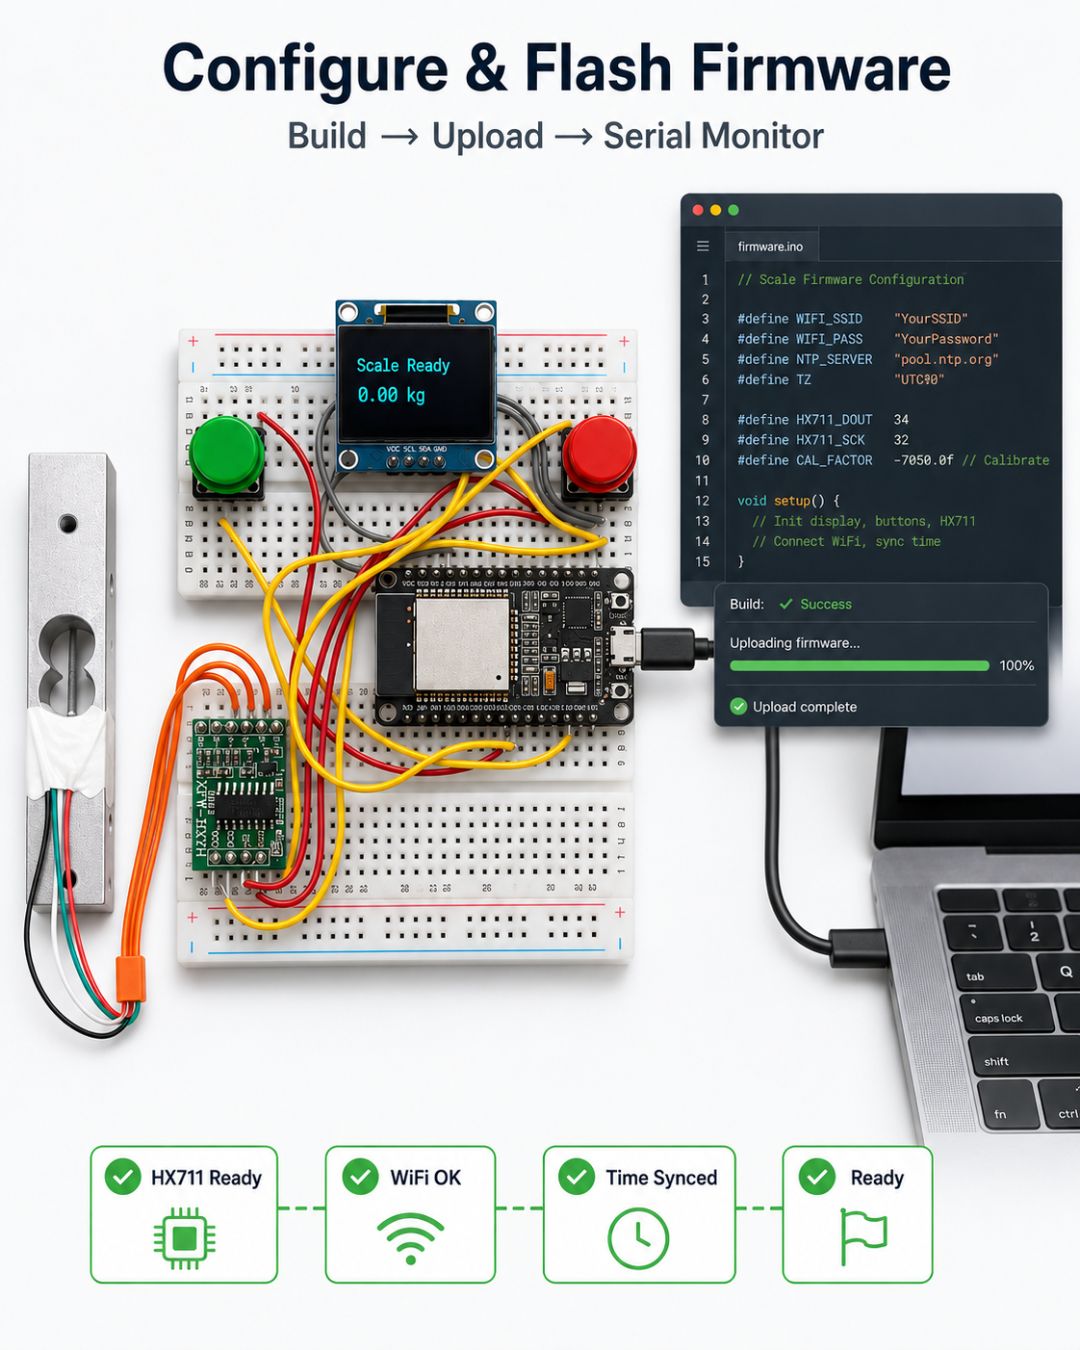
Configure and flash the firmware
Open
firmware/in PlatformIO, then:- Copy the example config:
cp firmware/src/config.h.example firmware/src/config.h- Fill in your details:
#define WIFI_SSID "YourWiFi" #define WIFI_PASSWORD "YourPassword" #define NOTION_TOKEN "ntn_..." #define NOTION_DB_ID "your32charhexid" #define GMT_OFFSET_SEC (-5 * 3600) // your timezone (example: US Eastern) #define DST_OFFSET_SEC (3600)- Build → Upload, open the serial monitor at 115200. You want:
HX711 ready,WiFi OK,NTP time synced,Ready.
-
 Generated image, for reference only 10 min
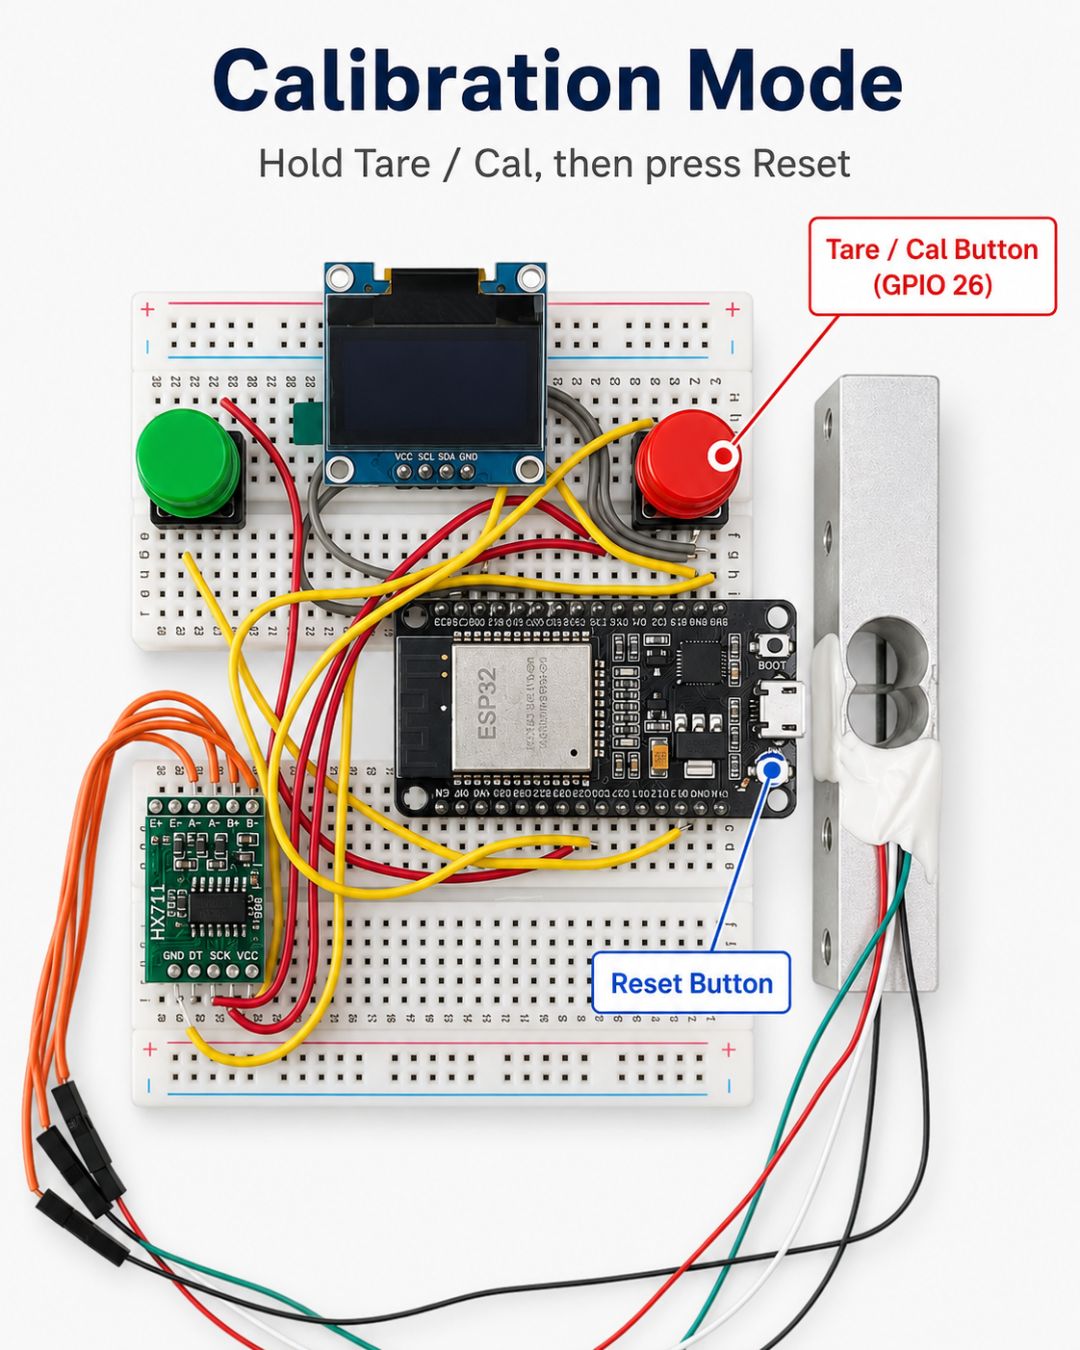
Calibrate once with a known weight
The firmware can't know how your specific load cell + mount turn force into
grams, so you teach it once.- With the stand empty, hold the tare/cal button (GPIO 26) while
pressing reset → it enters calibration mode and tares the empty platform. - OLED: "Place weight: 250 g" → set your known weight down.
- It reads, computes the calibration factor, and saves it to flash.
- Back in normal mode: empty ≈ 0 g, your known weight ≈ 250 g.
Calibration persists across reboots, so you only redo it if the mechanics change. Reading negative? Your signal pair is reversed: swap A+ and A−.
- With the stand empty, hold the tare/cal button (GPIO 26) while
-
 Generated image, for reference only 10 min
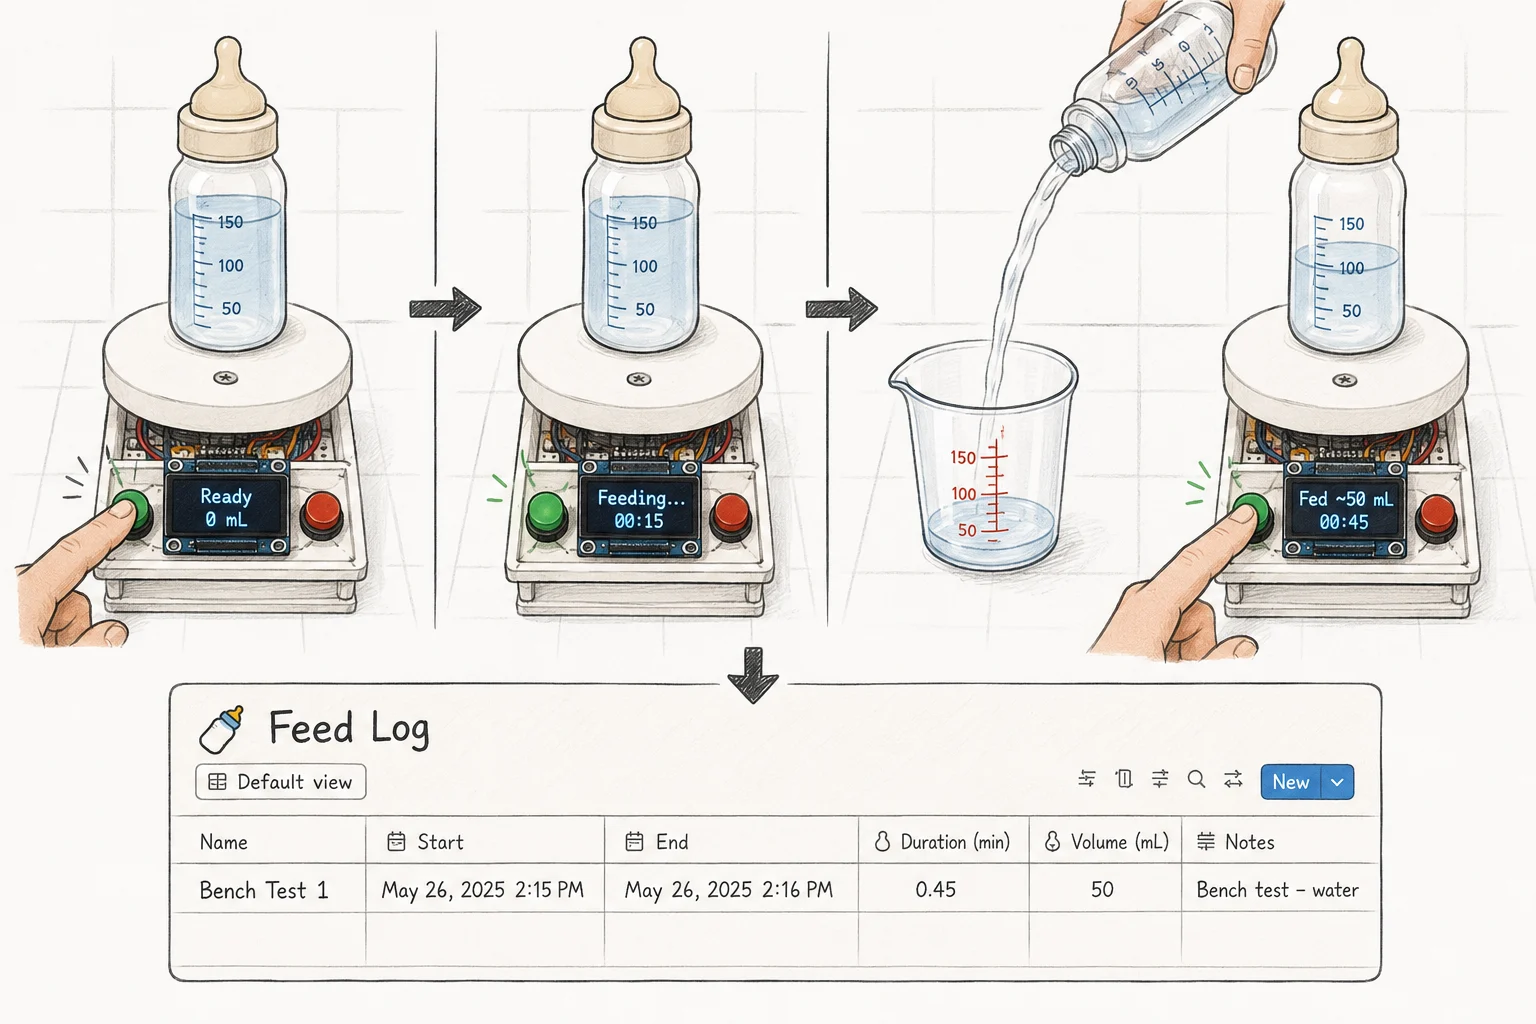
Bench-test a fake feed
Prove the whole loop before it ever touches a real bottle:
- Put a water bottle on the stand.
- Tap the button → OLED shows "Feeding…" with a live timer.
- Pour out ~50 mL of water (simulating what the baby drank).
- Put the bottle back, tap again → OLED shows "Fed ~50 mL".
- Check Notion: a new row with start / end / duration / volume should
appear within a few seconds.
Measure the poured water to confirm the volume lands within ±5 mL.
- print time
Print the stand (in parallel)
While you bench-test, print the stand. The one I designed is in
Files & models below: download the STLs and print them. Or
grab any load-cell scale-stand model on MakerWorld.Whatever model you pick, it must give the load cell a cantilever mount with
an air gap so the beam can flex. Most scale-stand models already do. -
 30 min
Mount everything onto the stand
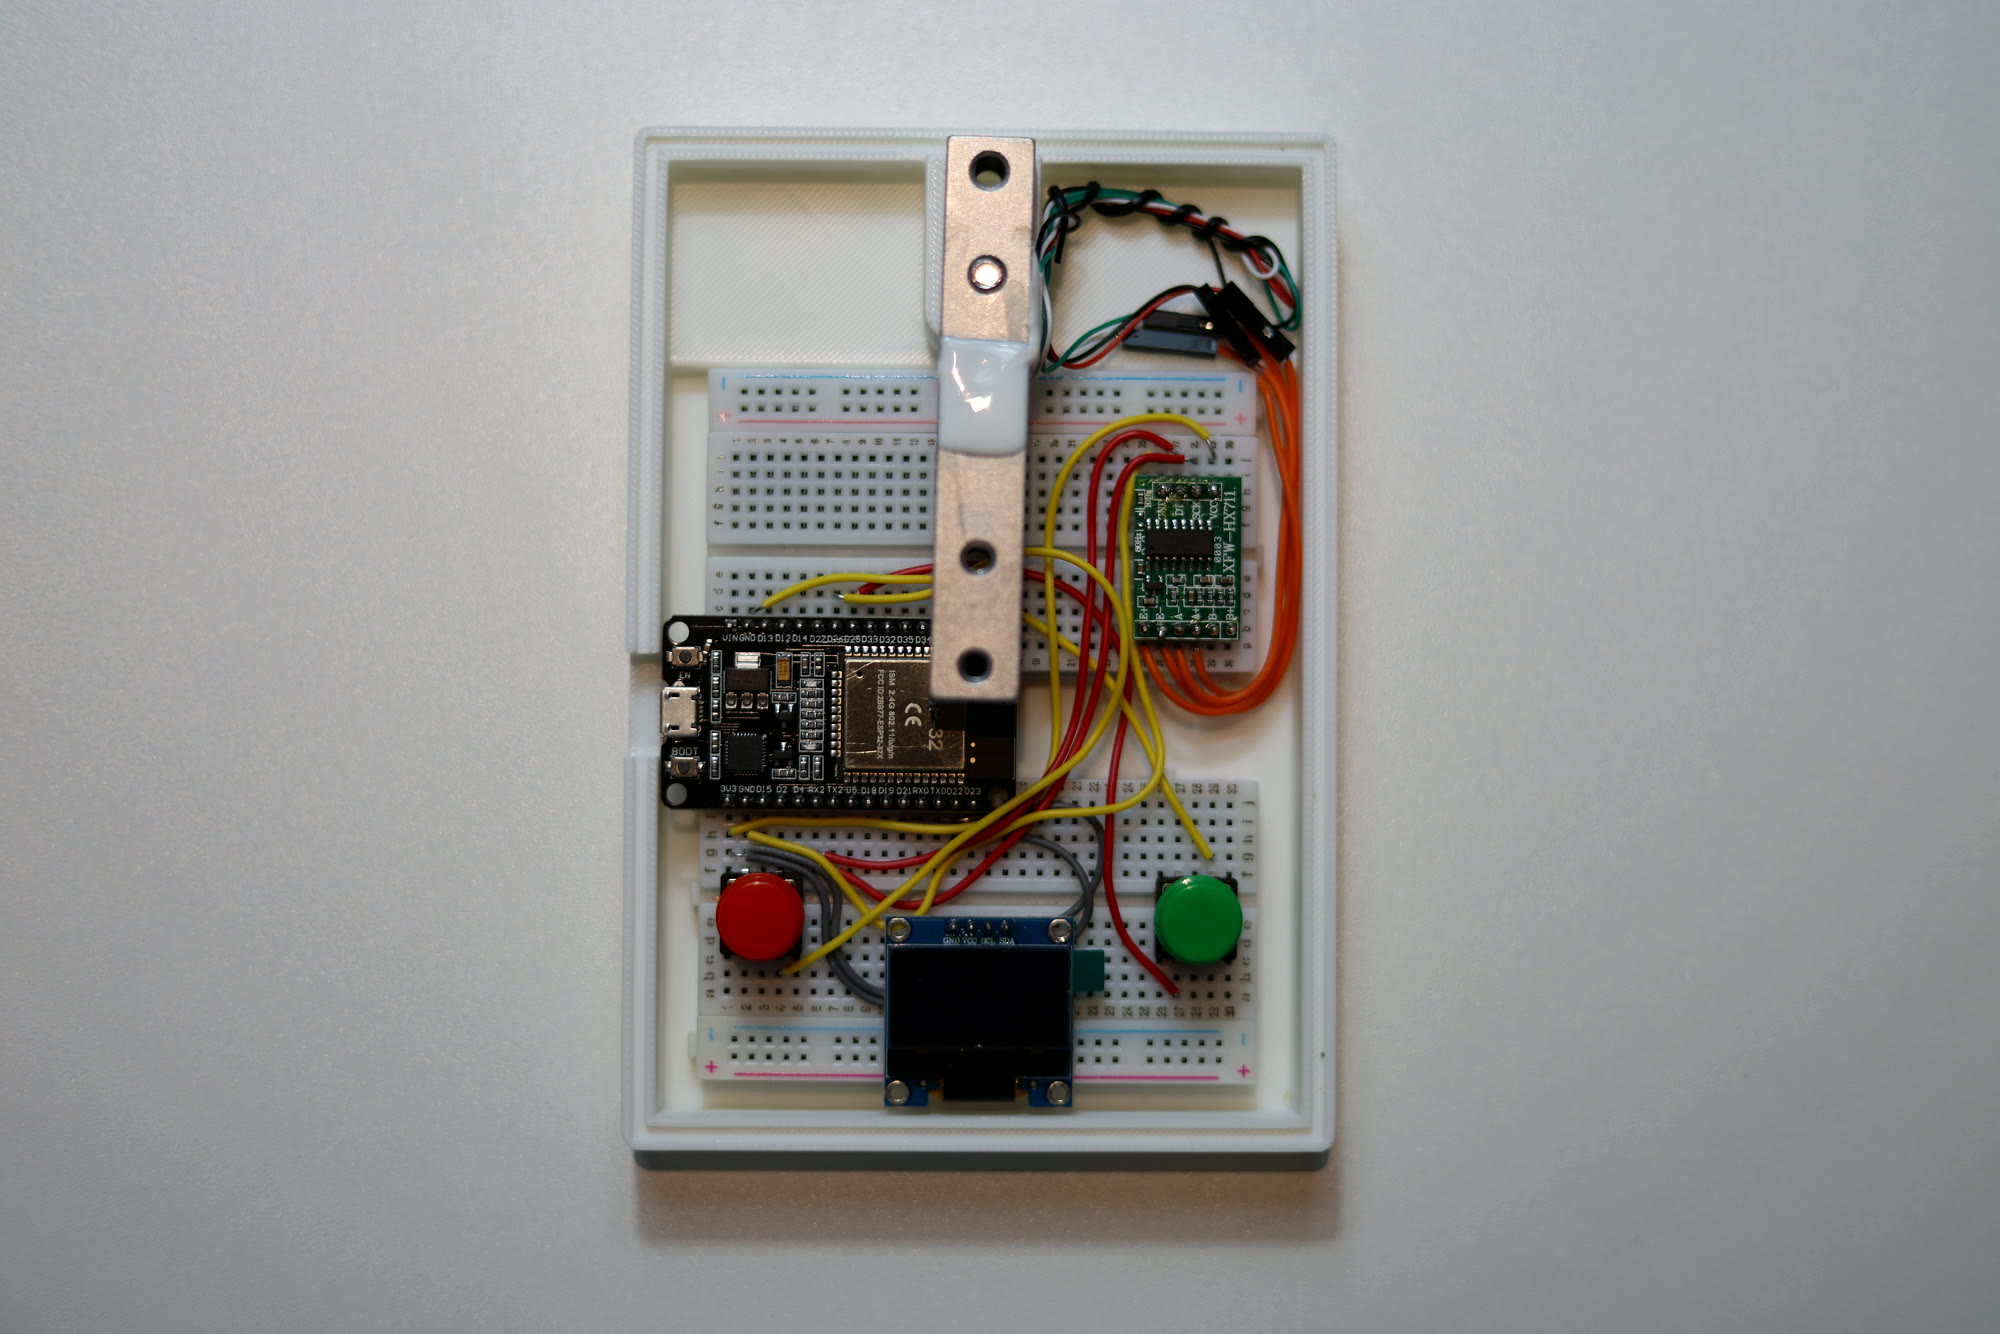
Per
hardware/assembly.md: the load cell is cantilevered, one end bolted to
the base and the other to the platform, with the HX711 close by and the ESP32,
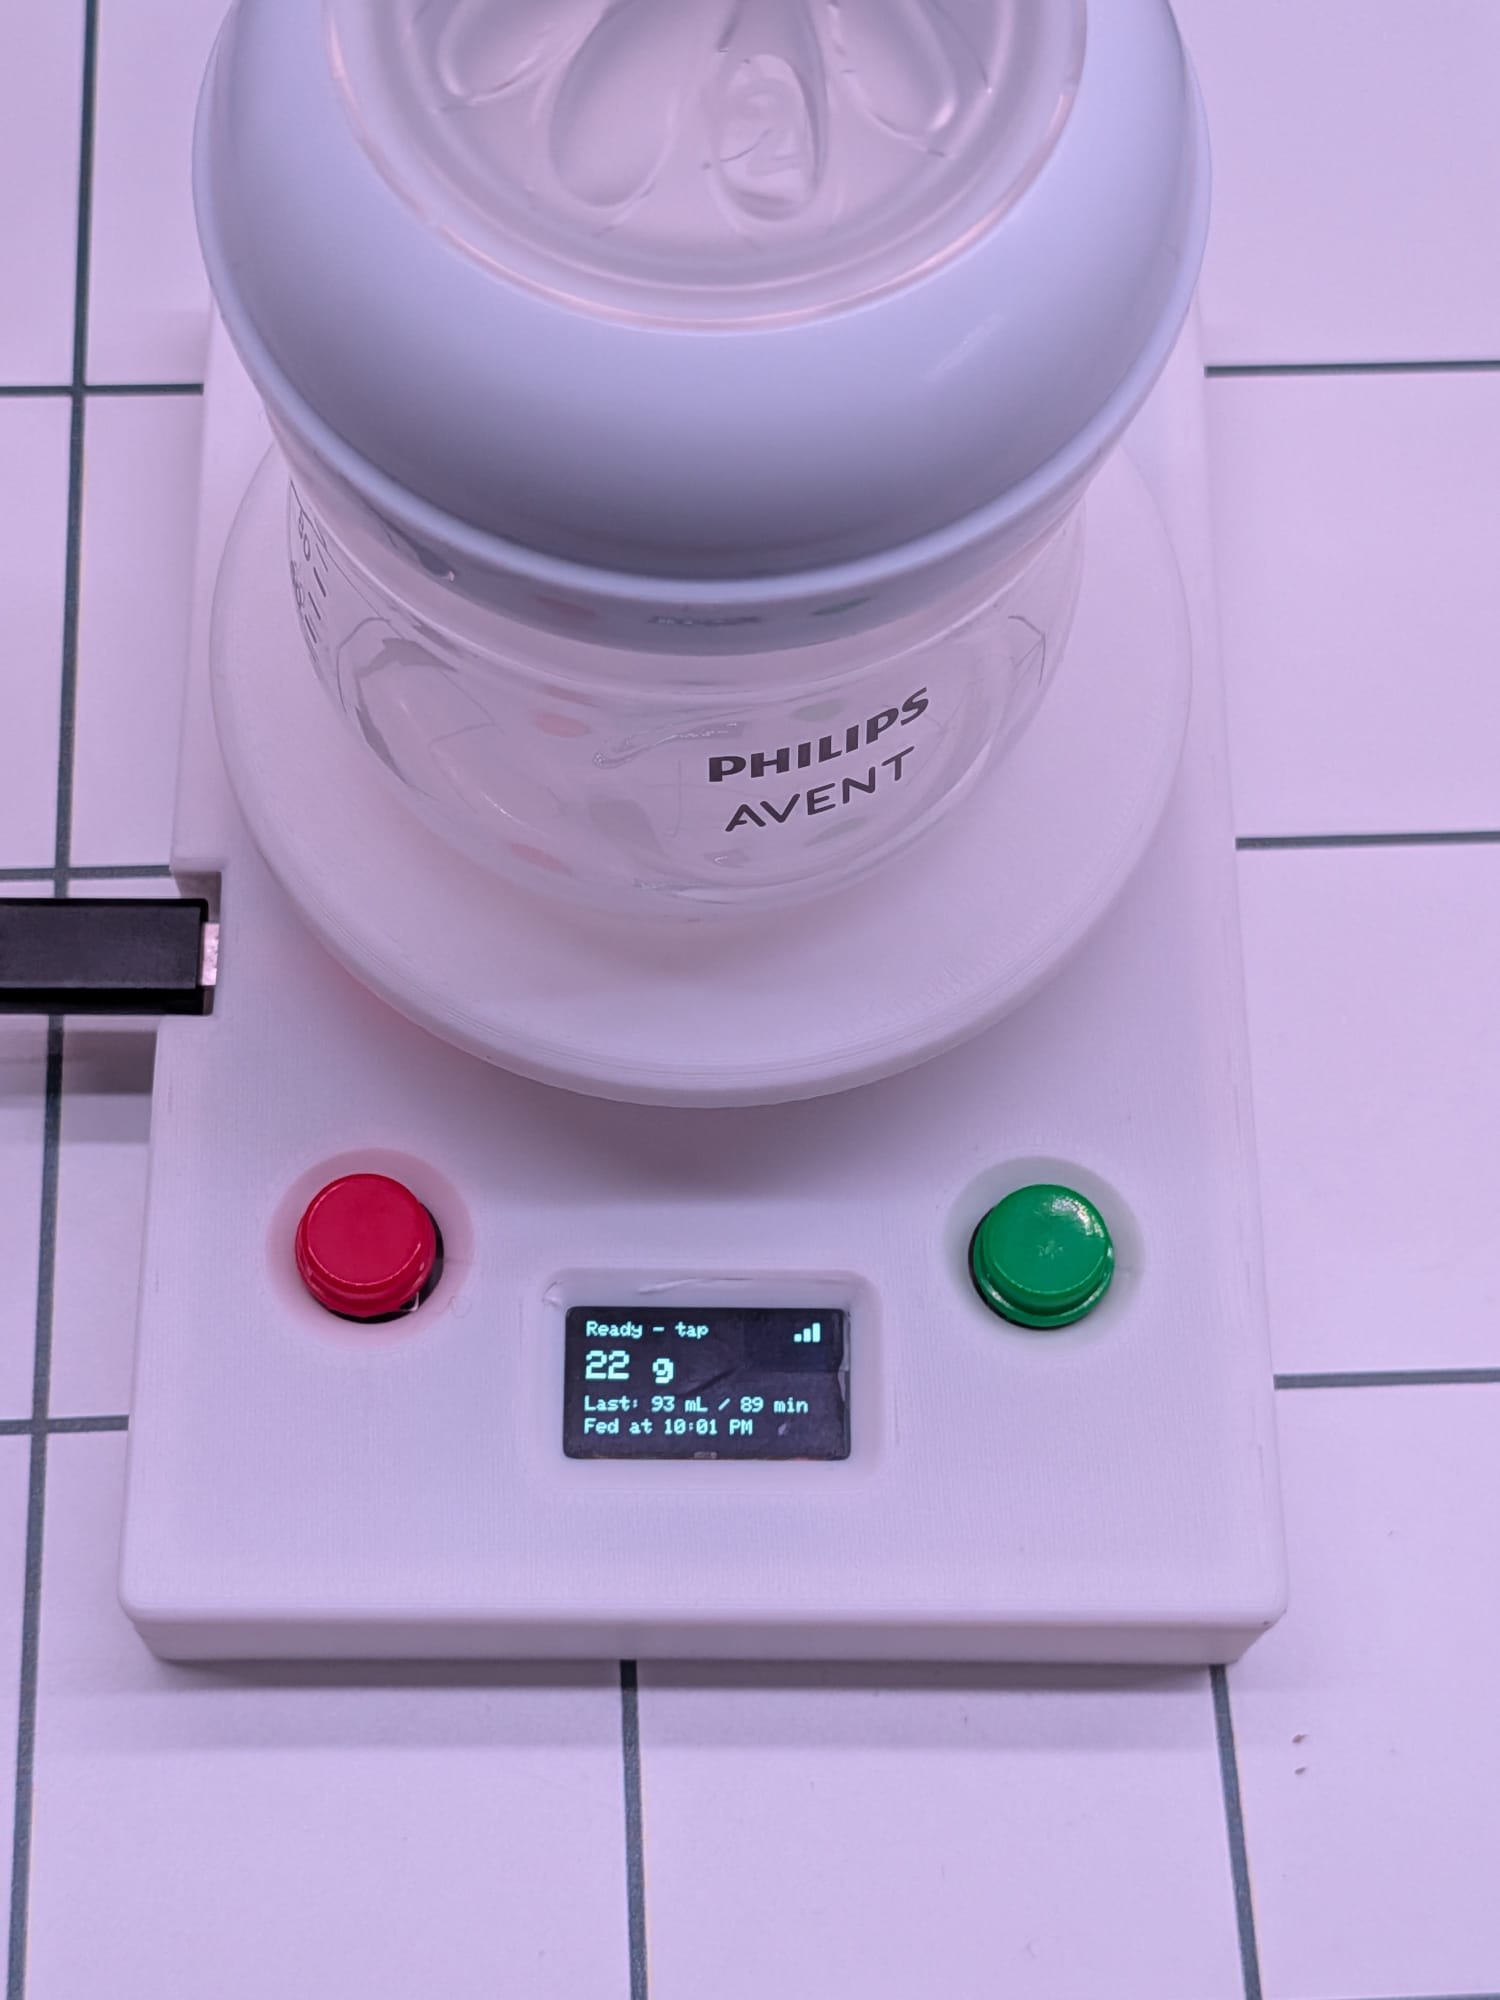
OLED, and button placed for one-handed use. Buttoned up, it looks like this.After mounting, re-verify an empty stand reads ≈ 0 and your known weight still
reads right. The mechanical change can shift the tare, so just tap the tare button.The one detail that matters is a real air gap under the cantilevered load cell, so the beam can flex. No gap, no readings, so check it before you close the case up.
-
 5 min
5 minPlace it where bottles happen
Counter, bottle station, or nightstand: somewhere flat, stable, and near
power and Wi-Fi. Add a wipeable coaster on the platform for the inevitable
milk drips. - ongoing
Use it for real
Next bottle: set it down, tap, feed, set it down, tap. Open Notion, and your
first real feed is logged, with the right time and volume. If you wired up
Telegram, you'll also get a "🍼 Fed 165 mL in 18 min" ping.Because it logs start-minus-end weight, the bottle cancels out, so you never tare per bottle or tell it which one you're using.
Gallery
The build, in pictures
-
Everything you need, laid out
-
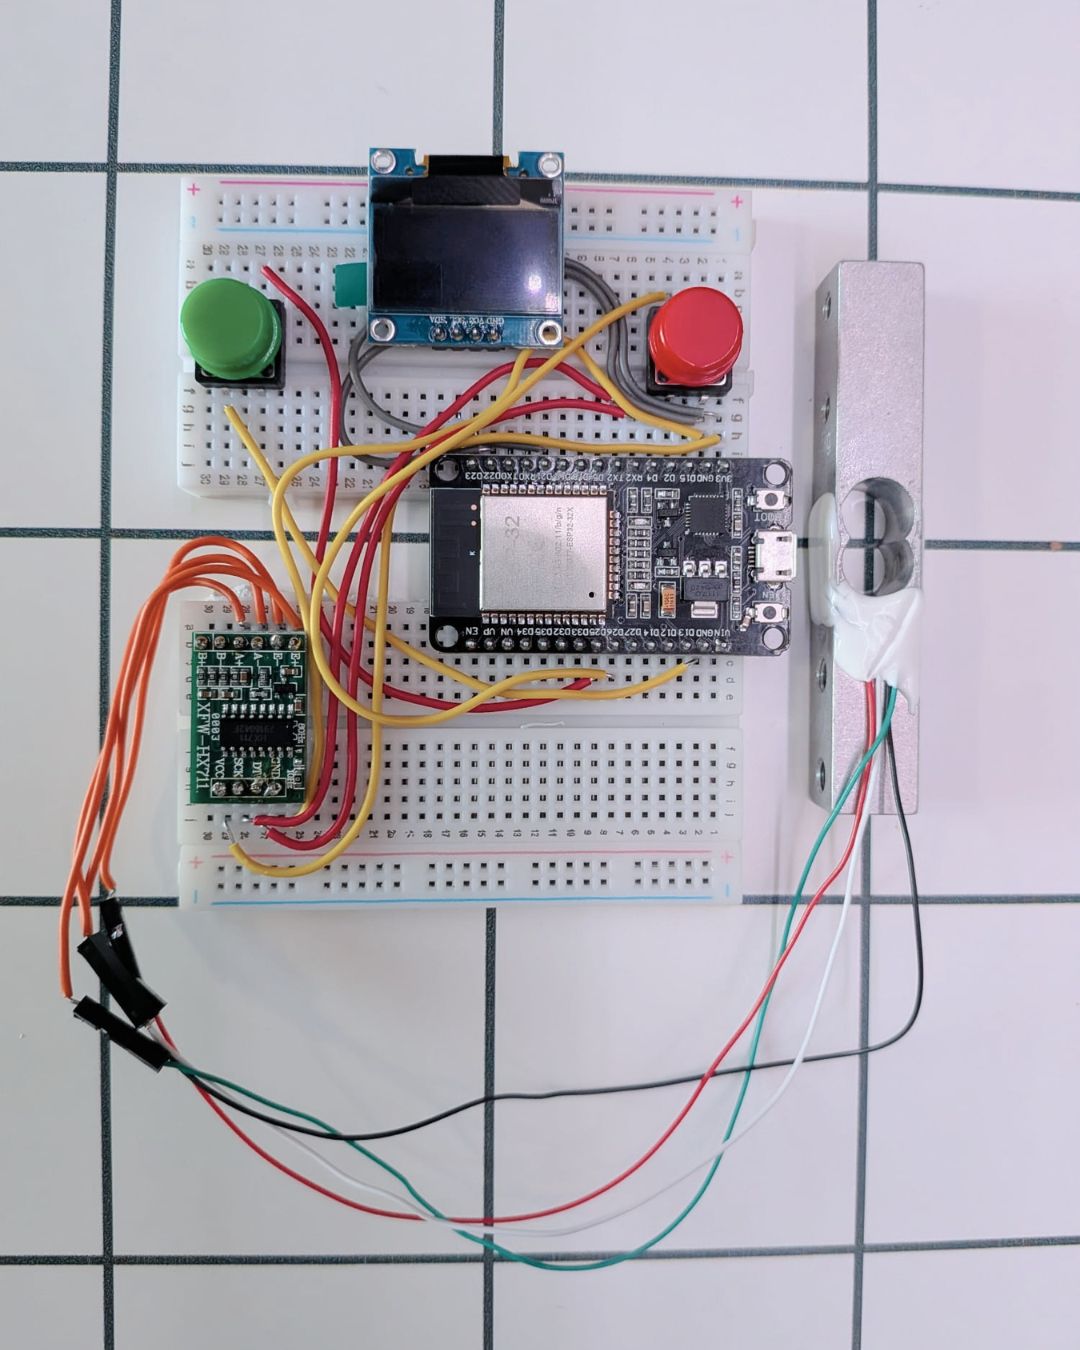
Wired up on the breadboard
-
Platform mounted on the load cell
-
The finished build
Files & models
The stand I designed for this exact load cell and bottle. I plan to publish it on MakerWorld as a future v2; in the meantime, grab the STLs here and print them. Prefer something else? Any load-cell scale-stand model on MakerWorld works too.
- Download ZIP
Base, top base, and bottle cover. Print in PLA or PETG. The print gives the load cell its cantilever mount with the all-important air gap.
If it misbehaves
Tuning & troubleshooting
- Readings are jumpyIncrease
SAMPLES_PER_READING, kill surface vibration, and shorten the load-cell wires. - Volume is off by a constant factorRecalibrate with a more accurately measured known weight.
- Tiny negative volumes on quick feedsNormal sensor noise; the
MIN_FEED_MLguard already ignores them. - Empty stand drifts from 0 over hoursTap tare occasionally; per-feed subtraction makes the drift negligible anyway.
- Wrong AM/PM or hour in NotionCheck
GMT_OFFSET_SEC/DST_OFFSET_SECinconfig.h.
Make one
A weighing bottle stand that auto-logs how much your baby drank, when, and for how long, straight to Notion. No 3am phone tapping.